-
 Adam Tuhkala
2Hey everyone, I’m working on a 1949 Bentley Mark IV and I am running into an issue. When I go to sew the “horseshoe” part onto the insert I get a ton of wrinkles. I tried starting in the middle and sewing out both directions to ensure that the cover is centered.
Adam Tuhkala
2Hey everyone, I’m working on a 1949 Bentley Mark IV and I am running into an issue. When I go to sew the “horseshoe” part onto the insert I get a ton of wrinkles. I tried starting in the middle and sewing out both directions to ensure that the cover is centered.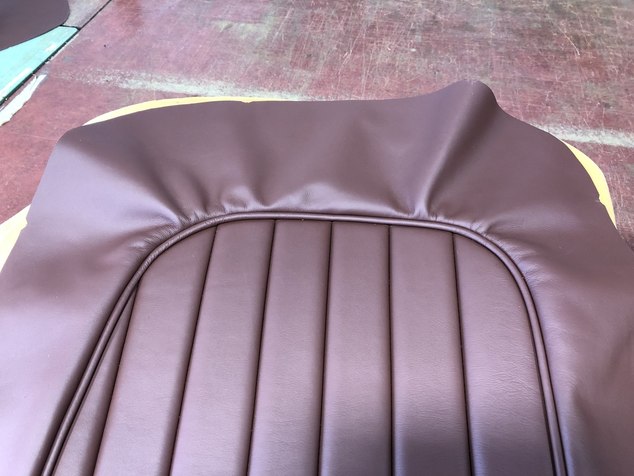
-
 Steve Ingram
36Sew the welt to the trim, not the insert. Put relief cuts in the welt so it will go around the corners flat. Give that a try and see if the results improve.
Steve Ingram
36Sew the welt to the trim, not the insert. Put relief cuts in the welt so it will go around the corners flat. Give that a try and see if the results improve. -
Adam Tuhkala
2I tried to test stretch it onto the seat and it was not coming out. It’s leather, vinyl I might of been able to pull out
ok I was wondering which side to sew welt onto. Was hard to tell from factory cover. I will give that a try. -
 Cody Lunning
39@Adam Tuhkala I had issues with this on one seat I worked on too. Luckily I could change the idea as the customer told me to just do whatever I wanted lol. But I’d like to see what fixes it.
Cody Lunning
39@Adam Tuhkala I had issues with this on one seat I worked on too. Luckily I could change the idea as the customer told me to just do whatever I wanted lol. But I’d like to see what fixes it.
For future reference. Always sew the welting to the flat piece. If you sew to pleats the welt will will have the same hills and valleys of the pleats. -
Adam Tuhkala
2thanks for the tips. I am currently trying it the other way and will post what it looks like. Unfortunately the customer wants it all original lol so I’m stuck doing it this way
-
Steve Ingram
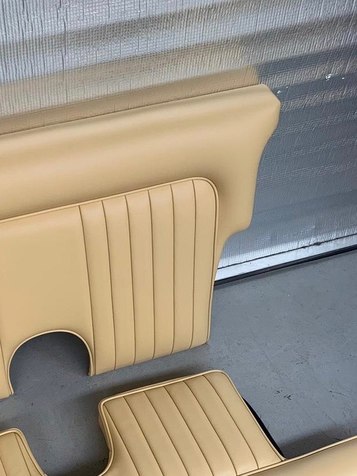
36You are welcome! Looks better, you are still stretching the trim piece a bit. You are on your way.
-
Adam Tuhkala
2in the picture I forgot to relief cut the trim so it sat funny. But thanks a lot. It’s crazy how the sewing order can effect it so much.
-
 Gareth Judd
12i would of machined the piping to the face and relive cut the corners, buy doing that you lock in the shape of the horse shoe keeping flutes straight, then machine the boarder , relive cutting as needed to hit your marks, this will give you a nice even bow all around the horse shoe. as you have it now your be fighting the cover
Gareth Judd
12i would of machined the piping to the face and relive cut the corners, buy doing that you lock in the shape of the horse shoe keeping flutes straight, then machine the boarder , relive cutting as needed to hit your marks, this will give you a nice even bow all around the horse shoe. as you have it now your be fighting the cover -
Gareth Judd
12
another example is this DB5 rear seat corner, with this i relive cut the horse shoe, pulled it straight where the corner is while machining the piping on and then machined it to the centre by doing this it gives the leather the natural shape of the seat BUT bear in mind this is stapled of around the back so i can manipulate the leather to suit.
with a front seat with piping down the side i would machine the piping to the face as above -
 Keith Mayne
38Would you mark the piping up/measure the piping so it matches size of the pleats, ie once you've sewn the piping around the corner of the insert mark at 1 1/2 inches(or whatever) to lock the pleats to that size.
Keith Mayne
38Would you mark the piping up/measure the piping so it matches size of the pleats, ie once you've sewn the piping around the corner of the insert mark at 1 1/2 inches(or whatever) to lock the pleats to that size. -
Cody Lunning
39@Gareth Judd sorry for being an idiot, but I’m much more of a visual learner. I read what you wrote, but not sure I follow it. Have any in process pictures?
-
Gareth Judd
12

The piping has been sewn to the flutes and the horse shoe panel has been relive cut and pulled round the curve while machining, which gives it the natural shape of the foam -
Adam Tuhkala
2oh wow! Thanks for the extra advise! That’s pretty much what I ended up doing and it turned out great


Welcome to The Hog Ring!
This forum is only for auto upholstery pros, apprentices and students. Join today to start chatting.
More Discussions


- Terms of Service
- Useful Hints and Tips
- Sign In
- Created with PlushForums
- © 2026 The Hog Ring