-
 Cody Lunning
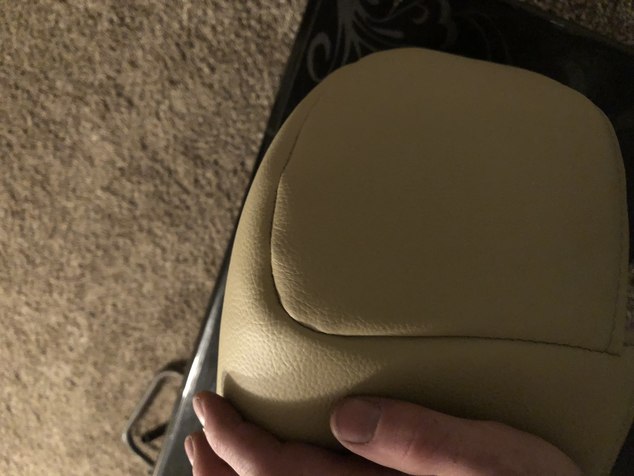
39Okay so I feel like this is a no brainer for most of you, and has been talked about before. For some reason on the tighter radius corners, for me, they are hit or miss. Some flow smooth and some not so much. I try to be consistent and smooth with my sewing and trim off the extra seam allowance. What are some things I’m missing? This is a pic of a tighter radius corner on a seat I did tonight. It’s just loose on the frame, but gives you the idea of what I mean. I wish it were smoother.
Cody Lunning
39Okay so I feel like this is a no brainer for most of you, and has been talked about before. For some reason on the tighter radius corners, for me, they are hit or miss. Some flow smooth and some not so much. I try to be consistent and smooth with my sewing and trim off the extra seam allowance. What are some things I’m missing? This is a pic of a tighter radius corner on a seat I did tonight. It’s just loose on the frame, but gives you the idea of what I mean. I wish it were smoother.
-
 Fred Mattson
152Is the cover padded? It almost looks like you have the material bonded to sew foam? If this is the case, Try to remove the sew foam from the seam before you sew it.
Fred Mattson
152Is the cover padded? It almost looks like you have the material bonded to sew foam? If this is the case, Try to remove the sew foam from the seam before you sew it. -
Cody Lunning
39Yes you are correct on both accounts. It’s 1/2 on top 1/4 on the sides. I will give this a try. Thank you Fred.
-
 William Duffy
13Something to think about. On tight radius corners I prefer to sew the face material which has the radius to the boxing. Try sewing both ways and see what works best for you. When I first started I used a book by don Taylor where he sews the boxing to the face material. Then when I went to work in a Upholstery shop they did it the other way. See what works on your project. The other big thing is practice! Small projects are the hardest to sew. I would use old outdated shop fabric and sew up a bunch of covers. Then do the real one. Good luck.
William Duffy
13Something to think about. On tight radius corners I prefer to sew the face material which has the radius to the boxing. Try sewing both ways and see what works best for you. When I first started I used a book by don Taylor where he sews the boxing to the face material. Then when I went to work in a Upholstery shop they did it the other way. See what works on your project. The other big thing is practice! Small projects are the hardest to sew. I would use old outdated shop fabric and sew up a bunch of covers. Then do the real one. Good luck. -
Cody Lunning
39@Fred Mattsonjust to clarify do I remove the foam on both the boxing and the top? Or just on or the other and only for the seam allowance?
@William Duffy yeah I’ve been getting better at using scraps and trying it before I give it a go on the material. I honestly see both ways. It varies from piece to piece and how comfortable it feels going through the machine. Sometimes I even switch how I sew starting at the center point of a project. Sew boxing to top half the way one way and then flip and sew the opposite. Not the best way to sew something I’m sure. -
 Jim Bentley
15You could also try regulating the seam, meaning, get both edges of the seam to lay flat on top of each other, on the same side. This can be done with your hand, or a regulating needle. Notching the radius also helps as well.
Jim Bentley
15You could also try regulating the seam, meaning, get both edges of the seam to lay flat on top of each other, on the same side. This can be done with your hand, or a regulating needle. Notching the radius also helps as well. -
 Keith Mayne
38Might also be down to fitting and how the seam allowance is folded.Might need one edge of the seam allowance trimming down a bit.Possibly cut the sew foam off the seam allowance.
Keith Mayne
38Might also be down to fitting and how the seam allowance is folded.Might need one edge of the seam allowance trimming down a bit.Possibly cut the sew foam off the seam allowance. -
Cody Lunning
39@Jim Bentley If I’m on the same page, I try to do what you’re saying by getting the seams to lay flat on the same side as best as I can. Doesn’t always work for the situation.
@Keith Mayne I originally thought along the same lines. I tried to adjust the seam allowance ao it was all laying the same once installed, that didn’t work so I trimmed off most of the allowance. After that then I figured I was doing something else wrong and posted. I’m sure a lot of it has to do with experience and skill along with the advice you’ve all given. I’m going to start with removing the foam from the seam allowance. -
 Cesar Chavez
15IMHO I think we should not cut off the seam allowance excess. I agree of cutting the foam in the seams...only the foam to avoid a bulky edge.
Cesar Chavez
15IMHO I think we should not cut off the seam allowance excess. I agree of cutting the foam in the seams...only the foam to avoid a bulky edge.
The seams would then be folded over to top view to get an even junction all around. It would help to give shape.
The cutting of seams too close the blind sewing junction would cause distortion along the edge.
I also agree that a straight edge piece should be sewn to a rounded seam piece. Although there are some exceptions. -
Cody Lunning
39@Cesar Chavez I was just rewatching your videos of doing the racing seat. It’s a great go to video. Can you explain what you mean by sew the straight edge piece to the rounded piece? Are you saying have the straight edge part on top while going through the machine?
-
Fred Mattson
152Cody-
I would most likely remove the foam from the seam on both pieces in the curved area. The bulk from the foam is causing tension issues. -
Cesar Chavez
15Cody Lunning, Certainly! thats is precisely what I have tried to explain.
Curved/round pieces should remain flat over the machine table while sewing. They should be simply moved over the table to always facing the machine operator. On the contrary, the upper straight piece should be the one to be 'manipulated', rolled, folded, etc. Of course, we could sew the other way, but it would be a little more difficult.
Just a particular tip some other car trimmers also follow as a standard rule.
Thanks for these interactive questions and answers related to our craft. -
 John Pollock
10Steaming the inside of that seam before you install the cover will help a lot.
John Pollock
10Steaming the inside of that seam before you install the cover will help a lot.
Also some times on tight radius's like that I have had good luck trimming back the seam allowance to a little less than 1/4". Ive never had a problem with the seam coming apart from trimming back the seam allowance. Don't cut too closet though or you will cause problems. -
Fred Mattson
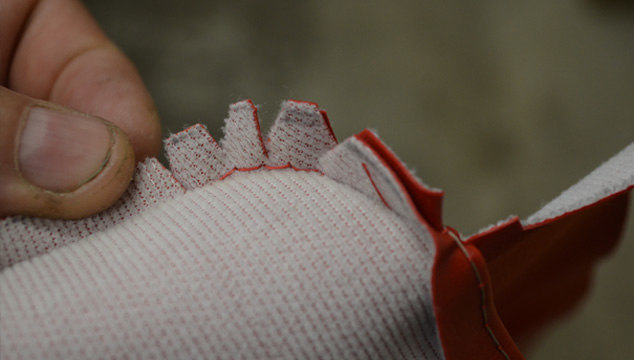
152Notching the inside seam allowance is also helpful to relieve the stress on an inside curve.
-
 kurt moore
7On tight curves I also put several notches and something no one has mentioned, I make my stitch length shorter. On real tight curves I shorten the stitch length as short as the machine allowed and go back to longer as soon as Im out of the curve.
kurt moore
7On tight curves I also put several notches and something no one has mentioned, I make my stitch length shorter. On real tight curves I shorten the stitch length as short as the machine allowed and go back to longer as soon as Im out of the curve. -
Fred Mattson
152You have to be careful with a short stitch length so that you do not perforate the material to the point it will tear out. It is best to eliminate any excess bulk in the seam allowance by cutting slits or notching the material.
-
Cody Lunning
39Fred when you say remove the foam from the seam allowance. Do you mean sew the stitch, come back and remove the foam after, or do you have .5” or whatever the seam allowance you use , smaller foam on back of the material sew you can sew and it’s already gone?
-
Fred Mattson
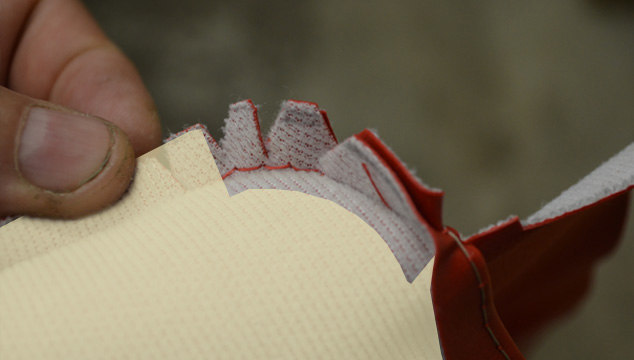
152@Cody Lunning
I have attached an image with the foam area marked. I use a half inch seam allowance and I would cut the foam 5/8 of an inch away from the seam before the corner is sewn. Leave the foam along the flat seams.
-
Cody Lunning
39Okay makes perfect sense now! Thanks @Fred Mattson also just ordered your book! Can’t wait for it to come.
-
Cody Lunning
39@Matt SonnenburgI can believe it. I talked with Fred briefly on the phone a while and he was full of knowledge and a great help


Welcome to The Hog Ring!
This forum is only for auto upholstery pros, apprentices and students. Join today to start chatting.
More Discussions


- Terms of Service
- Useful Hints and Tips
- Sign In
- Created with PlushForums
- © 2026 The Hog Ring