Comments
-
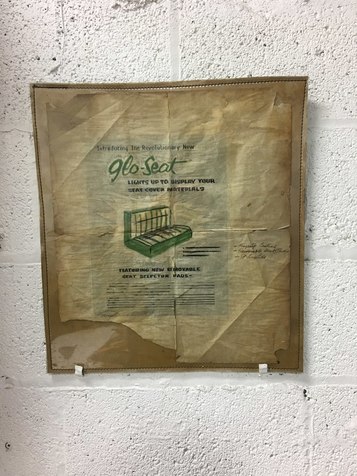
Nostalgic auto trim adsDuring the seat cover era thru the 50’s into the 60’s my dad created a display seat that would light up. You would place the different inserts onto the seat and flip the switch to the corresponding internal colored bulb. He used it at his then two locations and said it was a hit. This preliminary ad of his is all that remains.
-
How to insert piping between French seem.glue a thin piping welt to a flat base of material then glue your piping vinyl over top. Sew your facing vinyl to each side then top stitch. If you find its still too high, after gluing piping welt to the flat base material ,glue base material to each side of welt. This will sink your welt deeper.
-
Nostalgic auto trim adsThat's very cool! Great to see these vintage promo ads that were so important to our industry.
-
Custom foam seat (listing)Most applications we use multiple layers of various foam thickness. So when we cut through the first layer ( example 1") the piece can be peeled out leaving a clean groove .
-
Custom foam seat (listing)We glue the blades and put a drop of instabond. (crazy glue ) to lock in place. Adjust width with multiple layers.
-
Custom foam seat (listing)We cut the foam for listing by bonding two razor blades with various layers of panel board in between to the width of the opening desired.
-
Custom foam seat (listing)On some projects with insert listings instead of hog ringing, we use nylon tufting twine. Figure eight locking it to a mate wire under the seat. This method allows you to adjust each twin depth to create an even finish. Takes time but the job looks great when complete.
-
Tension issuesIt appears to be a thread issue since the machine worked fine with different thread. If you haven't, put in a new needle and switch the thread. Try it out and see if that works. Keep in mind thread does have a shelf life.
-
Having trouble with my machineTry loosening the top tension, that has worked for me. Try another thread, the bonded thread may be the problem. Fresh needle? Before starting with machine adjustments
-
Boat seat foam and glueUse polyester thread and bobbins as opposed to nylon for outside use. Marine grade vinyl , sew foam and landau glue you will be fine. I show my customers the specs from the products, it gives them confidence
-
Seat frames/springsBoth Fred and Chris have shown us different techniques with excellent results. Great job. I suppose it depends on what the customer wants as well as their budget.
-
Wind lace attachmentWhen I use cardboard for tack strip, I apply a layer of two part epoxy over top smoothing it out with a piece of foam. I find that it not only gives strength to the cardboard it also holds the staples better.
-
What’s the most profitable work?Restorations and customs allows us to use our creative skills. However they are extremely time consuming. I agree, to be profitable focus on daily drivers and commercial projects. The restos and customs will be there when you have the urge.
-
Wind lace attachmentHey Andy, I like the jig. Great way to trim the plastic tacking strip. I used to belt sand the edge off until seeing your method. Thanks
-
Request - tuck and rollI use various methods depending on application to create roll and pleats (aka tuck and roll ). I find this works best: Layout material draw lines 3/4" greater than pleat size ( 2" pleat mark 2 3/4 , 3" pleat mark 3 3/4 etc. ) glue material onto sew foam usually 3/8". Sew all the lines thru the material and foam then fold on the line and sew at 3/8" from folded edge. Some tricks: glue material to 1/8" foam and lay on top of 3/8" foam without glue. This allows pleat to puff up; Draw and sew lines with material stretch(selvage to selvage) This way when pleat is pulled side to side it doesn't stretch thereby eliminating it to flatten out.
-
Sew foam questions for all the trimmersI agree with you Kurt, it all depends on the project. If I'm undecided to glue or not, I'll try a sample of each to see what will work best.
-
Mark-all pencils/ chalk??? What do you useI use china markers( black and white) as well as a Space pen (silver). China marker cleans up well with Acry solv applied with foam or micro soft towel


Eric Gordon
Start FollowingSend a Message


- Terms of Service
- Useful Hints and Tips
- Sign In
- Created with PlushForums
- © 2026 The Hog Ring